Wednesday, June 25, 2014

Auction Pieces

My friend L Miriam Meserve of Miriam's Crafting Supplies is opening a brick and mortar store. The DT for Miriam's Crafting Supplies along with a few friends are helping her host an auction of handmade items to raise money to help with her endeavor. Where she lives there is no craft stores within a reasonable distance so we hope that her store is a rousing success and we want to do everything we can to help our fellow crafters and entrepreneurs. So I have made a set of wine glass charms. I am also doing a tutorial with it in case you don't win the item or can't afford to bid on them. Please though, someone bid! She needs our help!

So here we go...

Wine Glass Charm Tutorial

Supply Item list -

1. Wine glass rings (available now in my store which I haven't announced anywhere yet so your the first to know! Details at the bottom of the page)
2. Your choice of beads
3. A hanging charm for each ring. Mine are from Miriam's Crafting Supplies and are all based around this months WINGS theme
4. Jewelry pliers


Assembly -

1. Take a ring and your pliers.
2. Open the ring and then gently bend back the notch.


3. Start stringing your beads in the order you desire. I used some rhinestone dangle charms along with metal beads. To get the rhinestone to show I just gave them a gentle twist bending the top enough for it to lay flatter. These dangle stones are also available in my store!


4. When all your beads and your charm are on the ring, gently bend your notch back in place.
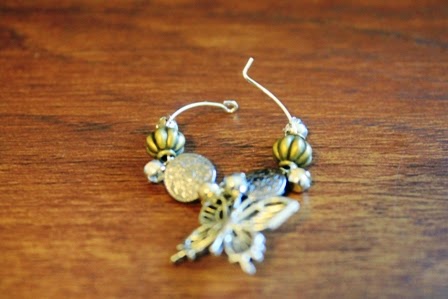


And there you have the finished product! Here's a few pictures of the set I made.


Miriam's Auction will be held July 27th - July 30th. Go bid on some of the magnificent projects there! It isn't a big auction, but every little bit helps when your raising money :) I will put the link up the day of the auction so look for it Friday morning!

Now for the details that only YOU will know at the moment about my store. I currently have about 75 items listed and have more coming in daily, which is why I haven't announced it yet. Before I make the BIG announcement, I want to be fully stocked. The theme tends towards wedding and shabby chic. It's mostly lace, doilies and a few other embellishments and glass crystals.  I do have one EXCITING new tool that I'll be bringing to all of you but I am saving that for the day I make the announcement so it isn't up yet. I'll be giving some of them away so stay tuned! In the mean time I'd love for you to check it out.

One of the very unique things about my store is that you can ORDER IN 1/2 YARD INCREMENTS. I know how many times you don't need a full yard and now, you don't have to worry about all those left overs...unless you want to that is! You can order as many 1/2 yards as you think you want and you will get it in a continuous piece. I hope you like this new idea!


Here's the link:      Gone Artsy  Hope you stop by and take a look and let me know what you think!


So that's it for me today!

Love ya!
~Deb~

Saturday, May 31, 2014

A video to watch while I unpack!


Well I finally finished the wedding and have moved to beautiful Destin, Florida! I haven't had to time to create since but I will be back as soon as I unpack. In the mean time I will do some wedding video's for you. This is the first part and is all the creations and views with no one in them so you can just look at the beauty of the items we used. I hope you enjoy it as much as I did creating it!


Love ya,

~Deb~

Friday, May 9, 2014

Manipulating Metal Embellishments

It's Metal Month at Miriam's Crafting Blog. Here's a little inspiration in the form of a quick video tutorial. Come join in the challenge and show us your metal!


Love ya,
~Deb~

Wednesday, May 7, 2014

It's Metal Month!

Miriam's crafting blog's theme this month is Metal. I'm so into steampunk I bet you think that's what I'm gonna show you but nope! My first project is Alice in Wonderland themed.

I had some 5x5" metal plates I had gotten from Pick Your Plum hanging on a peg just waiting to be used and here was the perfect chance. They came in yellow or gray so I went with the gray for the more metal look.

First let me say, I am 90% packed for my move to Florida and working with VERY limited items so creating is a challenge at best. I had some embellishments I had bought at Micheal's so with only those things, a printer and some cardboard I came up with this...


I took Miriam's corner embellishments and cut them apart to make the trim around the keyhole. The key hole was the hardest part of this project! I really struggled to make it look how I wanted it. I had to use a marker to distress the edges a bit because my ink pads were all packed. Were I to do this again I would definitely use an ink pad.

The products I used from Miriam's Crafting Supplies are:

Silver Tone Corner Embellishments
Winged Key
Lightbulb Charm

She also has the watches and gears but i had the ones I used on hand. You could almost one stop shop for this project!!!

Hope you like it. My tutorial for Miriam is scheduled for Friday but I'll be on the road so I won't be able to check for comments for a bout a week. Have to get my computer set up etc. once I get there :)

Next stop...Sunny Florida!

Love ya,
~Deb~

P.S.

Once I get settled I'll tell you all about the wedding too!


Wednesday, April 23, 2014

Final Wedding Preparation Craft

Well we are in the final count down to Jen's wedding. Three (3) days from now the event will be happening with all the things I've created for her. Today I want to show you a vintage style hat pin and button holder that will be in the women's trunk for the vignette.

Miriam's Crafting Supplies Blog has burlap and since we were tasked with texture this month, I thought the burlap would fit in nicely with both her theme and the wedding. Miriam carries burlap in multiple colors in 12x12" squares, perfect for using on a project. Of course I choose natural since I was going vintage!

I had an octagon shaped jelly jar that I thought was unique looking so I wrapped the jar in the burlap, added a piece of thin lace around it, and made an eyelet lace flower for the front. In the center of the flower I placed one of Miriam's pearls (available in lots of colors and sizes for such a great price!).

Next I took an old t-shirt that was close in color to what I wanted for the top and cut a large circle. I glued that all around the edge of the lid of the jar leaving about an inch unglued so I could stuff it. I stuffed it with fiberfill until it was the thickness I wanted and then glued the last bit of the t-shirt to the lid. I trimmed it closely and then added the same eyelet lace around the edge to cover the glued areas. Lastly I added a twine band with a pearl to finish the look.

I filled it with buttons. Some I had on hand and some are from Miriam's store. To top it off I added some hat pins. The feather pin ties in with the feathers we are using at the wedding and I used an acrylic crystal drop, also available at Miriam's store. The one with the white flower on top was made by my good friend Angela Holt of Angela Holt Designs. 

So here we go...pictures of the final product!

Wish me luck! I'll post pictures etc. of everything about the wedding as soon as I can!

Love ya,
Deb

Wednesday, April 2, 2014

It's All About Texture

1tex·ture noun \ˈteks-chər\

: the way that something feels when you touch it.

Straight from Merriam-Webster's Dictionary. 

As humans we love to touch and feel things. It heightens our sense of satisfaction whether it be fabric, food, nature. Our sense of touch is one of the things we were blessed with.

This month Miriam's Crafting Blog challenge is all about texture. We want to see you create things with different textures in a project. For my inspiration project for you, I created a no-sew glasses case complete with an outside pocket. Perfect to take to the beach or pool to hold your sunglasses, driver's license and a couple of dollars to buy a refreshing drink!

Supplies:
(sorry, a bit blurry, taken on my phone)

Burlap (in your desired size) - available through Miriam's Crafting Supplies
Chenille Fabric (large enough to create the pocket on one side of your project)
Wide Ribbon (for accent strip on pocket)
Seam Binding
Twine
Glue Gun
Glasses Charmavailable through Miriam's Crafting Supplies

Step 1. Fold your burlap in half and seal your edges, leaving the top open, with the glue gun. The nice thing about burlap is there is no wrong side to it!

Step 2. Create a braid of twine to serve as your pull string. Make sure it's long enough to go around the entire top of bag with extra to knot off a bit outside.

Step 3. Place your braid around the edge of your bag about 1/2" down from the top and glue the middle just on one seam.

Step 4. Fold over the top edge creating the drawstring area (about an 1" to an 1-1/2"fold) then carefully glue the edge down. Be careful not to get the braid caught in the glue.

Step 5. Turn it right side out and knot your braid ends together so it doesn't slip through.

Step 6. Cut your chenille to the size of the front of your bag leaving about a 1/4" seam allowance, for sides and 1/2" seam allowance for top and bottom.

Step 7. Glue the seam allowance down on the sides (1/4"). Repeat on top and bottom (1/2")

Step 8. Cut a strip of your wide ribbon about 1"longer than the width of your chenille piece. Fold over the front and glue the edges to the back side.

Step 9. Proceed to glue the entire chenille piece with attached ribbon to the bottom of your burlap bag. DO NOT GLUE THE TOP AREA DOWN. This creates your pocket.

Step 10. Glue your seam binding to the edges of the bag (folded over the front and back to actually cover the seam).

Step 11. Tie a little knot on each side of the glasses with twine (you could use pearls or rhinestones if you prefer). Glue to the front of your pocket.


I put my keys and the pen in just to show the pocket :)


That's it! Another quick and easy project but with lots of touchy-feely goodness to it. Come join us and create your idea of textured art. Enter to win this months challenge and win a prize from Miriam's Crafting Blog!

Love ya,
~Deb~

Friday, March 28, 2014

Vintage Etched Mirror Tutorial

I've created another project for the vintage vignette I'm displaying at the wedding. I think it's going to fit in so beautifully with the antique trunk, jewelry etc. I've done this as a written tutorial instead of a video this time as I just didn't have the time to spend editing one. It's easy to follow so you should have no problem recreating it or doing your own style if you follow this step by step. Feel free to copy and save in a document for later or book mark this page to come back to!

Vintage Etched Mirror Tutorial:

1. Remove your mirror from it's frame if desired and/or possible. (For me it makes the angle of writing easier so I recommend you do it if you can)


2. Wash the mirror with mild soapy water, dry well.

3. Clean the surface with rubbing alcohol to remove any left over residue of soap or other things that could cause resisting of the etching cream.

4. Using the Etchall Designer Tip Kit, fill your bottle with Etchall Etching Crème, remove the white top that serves as the plug for the bottle when not in use, and attached your desired tip width for writing.


5. Write your sentiment, draw or whatever you like on your mirror front. Be sure to follow the directions to clean your tip so you can use it again and replace the whit top on the bottle.


6. Allow to sit for 15 minutes to process.

7. Rinse under warm running water using a sponge or soft cloth to quickly wipe the etched area. This must be done very quickly to avoid etching any other part of the mirror. Once completely rinsed, dry well with a soft cloth.

8. Place the mirror back in it's frame if you removed it.


9. Decorate to your liking.

Here you can see the definition of the etching.


Better tones for seeing the variegation in the frame.


And close up of the detail in the gorgeous buttons from Miriam's Crafting Supplies.


For my piece, I brushed the entire frame with burnt umber acrylic paint let it dry literally about 1 minute, then wiped, just the surface, with a baby wipe so that the paint would stay in most of the crevices. I let it dry completely then.

Next I used Metallic Peridot paint and just dabbed it here and there to give it a patina of sorts. Because it was a metallic paint it blended well with the original gold surface. When that was dry I lightly, and I mean VERY lightly, sanded some areas off.

Then I just added a few embellishments on the front (love those buttons!) and I was done. Quick and simple, less than an hour including the etching time.

How simple was that! A stunning piece for display that says EXACTLY what YOU want it to say! Not a store bought saying that everybody and their brother can purchase. That's the best thing about Etchall products, the result is all you baby! 

Pop on over to Etchall's website and take a look at all the fabulous products available and check out their Facebook page for inspiration. They have some GORGEOUS ideas! 

And don't forget to visit Miriam's Crafting Supplies for embellishments. She has the best stuff at great prices!

I also have to give a little shout out to my new favorite second hand shop Darling Decor' & More. If you live in the central Texas area you have to come to Temple and see them! They have the CUTEST stuff for REALLY REASONABLE prices! I have gotten so much for the wedding from them. I think this little mirror was like $6 or some crazy cheap amount like that. You'll see lots more of their stuff when I show the wedding pictures but they have been the best to work with! If they didn't have what I needed they tried to find it for me and so far they've found every single thing I asked for and still didn't charge me a ton. I so love that place!!! I'm going to have to visit them every time I come back from Florida to visit my kids!

I hope you enjoyed this little tutorial and it inspires you to create something unique for yourself.

Love ya,
~Deb~