Wednesday, November 19, 2014

Cigar Box Anyone?

It's still steampunk theme for Miriam's Crafting Supplies so for my second project this month I chose to make an altered cigar box for my cousin. He smokes cigars and gave me a bunch of boxes so I felt the best way to thank him for those was to make him an altered one for his humidor room. I used a traveling theme with a train, hot air balloon, clocks, springs, gear key, typewriter keys, chipboard gears, chains, a mini bottle and some resined chip board quotes. The paper was DCWV. I also used a Tim Holtz Stencil and some DecoArt Terracotta paste. I'm in love with the clawed feet from Miriam's store. I think they really added to the piece.

I had a ball making this. I always do when I'm working steampunk! I hope you enjoy peeking at it!

The Top


Front

Sides

Back

and the Inside Top

I left the inside of the box plain wood.I wanted it to be rough and manly. I plan to put a bottle opener and a new cigar cutter in there for him. I'm hoping that he will love displaying it in his "special cigar room".

Thanks for stopping by again and as always...

Love ya!
~Deb~


Tuesday, November 11, 2014

Altered CD

I joined an Altered CD swap for a group I'm in on FaceBook. I've never made one before so I thought it would be fun to try. The theme was Thanksgiving. I think it turned out OK but not having done one before I'm not sure. I'd love to hear what you think.


Thanks for stopping by to have a look and I look forward to reading your comments.

Love ya,
~Deb~

Wednesday, November 5, 2014

Steampunk Style

Happy November and welcome to all the new followers! Thank you everyone for continuing to read this blog and supporting my work!

This month over at Miriam's Crafting Blog, the challenge is about Steampunk style. We want to see your take on it!

The designers have come up with some great inspiration so I hope you will check out the blog to see everyone's work and then join the challenge by entering yours!

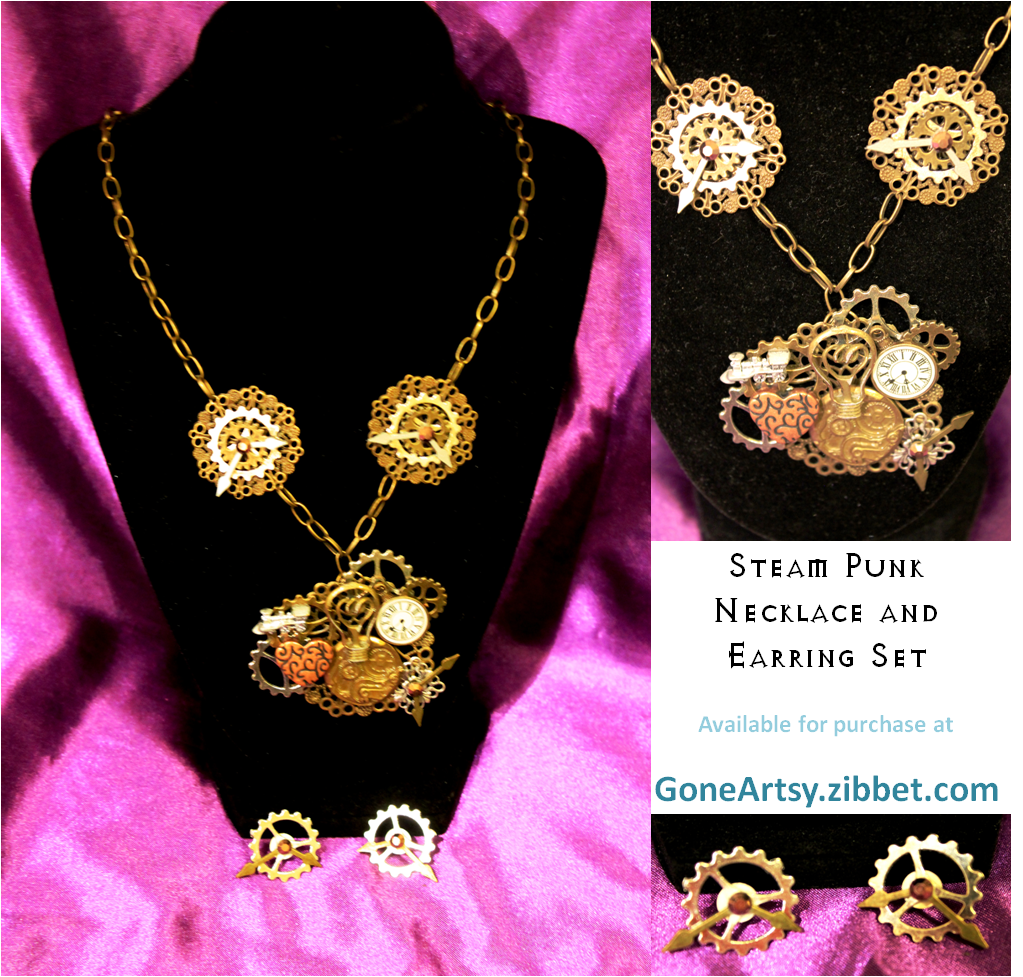
I have designed some jewelry pieces and have decided to carry them in the Gone Artsy store. Each piece will be unique and handmade. So come check them out periodically. Currently I have 2 pieces available but more jewelry to come! I am loving making these!

All of the products used in this necklace set are from Miriam's Crafting Supplies with the exception of the chain and the copper heart. Hope you like it!


Thanks for stopping by!

Love ya,
~Deb~

Friday, October 24, 2014

Pink Passion!

As usual I am way behind in posting! I do actually have a good excuse this time LOL!

Mid September I had a total knee replacement done on my right knee. They say it's the second most painfully surgery there is. I can honestly say it wasn't nearly as bad as I expected and maybe that's because the docs told me that! It is however a slow recovery period. Nearly three straight weeks of basically bed rest with exercises (PT came to the house everyday) and ice while you lay there. After that there's Outpatient PT for a month 3 times a week. Your stamina goes way down and every effort exhausts you, but pain?  Not so bad. Anyway I am mid way through recovery and walking with out a cane so I'm REALLY happy with my progress and can get back to a fairly normal life. I still have the PT and I still get more tired then before but each day is a little better.

So enough with my excuse! Let's get to the projects I did for this month.

As you all know, Breast Cancer Awareness is crucially important to me. It runs in my family and I keep a close watch on mine and get my mammo's regularly. They may be a pain but if they can save my life I'm doing it! 

Gone Artsy and Miriam's Crafting Supplies have teamed up this month to do an auction to raise funds for this important cause. DT members from both groups, which of course I am on both :), has each made project(s) to donate. They've spent their time and materials creating some AWESOME art so I hope you will come join in and if you can bid, if you can't bid invite your friends and maybe they can! The funds raised will go to The Breast Cancer Research Foundation. You can find the event on Facebook here: Auction to Benefit the BCRF

The first two projects were made for earlier this month and the last is a YT tutorial on a canvas. All of these will be up for auction. I hope you like what I've done!


To see what's inside, you'll have to go to the Gone Artsy Blog or to Miriam's Crafting Supplies Blog


And here's the tutorial link for the canvas


PLEASE come help us with this EVENT!

Love ya,
~Deb~


Thursday, September 4, 2014

Pop Goes the Gum

It's time for Miriam's Crafting Blog Try this at Home Friday Tutorial and It's my turn again! Keeping with the St. Jude's kids theme I've created instructions to make a faux bubble gum machine. So are you ready to start?


Supplies:
1 clay pot (I used muffin size)
2 clay saucers to fit this size pot
Acrylic or spray paint in color of your choice (if you use acrylic you will also need a clear sealer)
Round glass vase to fit your size pot
E6000 or other strong water proof glue
1 embossed box corner
1/2 of a round metal latch
1 30mm wood button
1 round bead
1 flat back pearl
1 shank style button for your knob
a small spring
2 small jump rings
Ribbon to embellish with
Bubblegum to fill it!

1. Take your clay pot and 2 saucers and paint them inside and out with paint color of your choice.
2. When the paint is dry, glue the glass vase into one of the saucers as shown.

3. When that step is completely dry {don't do it to soon or you'll break it like I did :( }, glue that piece to the BOTTOM of the clay pot.
4. While step three is drying you can work on your lid. Take the second saucer and glue your wood button to the center. You can paint it if you like but I liked the yellowish wood tone on mine so I left it plain. I turned it upside down so there was no pattern showing. Glue the bead to the center of the button and then add a flat back pearl to the very top to hide the hole in the bead. This becomes the handle to your lid so make sure you use a good glue.

5. For the spring, I used one out of a pen and then cut it in half. You don't want the turn knob to stick out to far but it does need that added dimension. Twist the end of the spring on to the shank part of the button and then glue that down.

6. The box corner and latch parts were originally bronze. I sprayed mine silver because that's my memory of bubblegum machines. That bright shiny silver was so enticing! I trimmed on edge of the box corner to make it look like a spout before I painted it. Th attach the two pieces use your small jump rings through the provided holes.

7. Attach your ribbon and the glue the spout and knob over the seams to hide them. Fill it with gum and put the lid on. Enjoy an occasional treat with the kids!
How cute would this be sitting on your desk filled with beads instead? These two will be included in the auction over at Miriam's FB event for St. Jude's. Please stop by and help this great cause! You can find it by clicking this:


Love ya,
~Deb~

Wednesday, September 3, 2014

She's Puzzled!

This month at Miriam's Crafting Blog the theme is children. We are doing it in honor of St. Jude's as that is a charity near and dear to Miriam. Each of the DT members created an item to auction off for the charity. 100% of the proceeds will be given to the St. Jude's foundation.

Please join with us by donating in the event area on FB for this worthy cause. The event is linked here: St. Jude's Charity Auction 

So for my project I used from Miriam's store:

Pink Necklace Base
Puzzle piece charms
Made with Love charm
Silver flat back pearl
Pink Rhinestone

I also used from my stash:

A felt heart
Pink jump rings
A bottle cap charm
Silver wood beads
A Pink Sharpie
Mod Podge Dimensional Magic

And here's what I made out of all that...


And I created a box for it so it can be easily gifted with no fuss!


Hope you like it. Stop by and see what other fab items are up for auction by all my DT sis's. Again you can find the event at St. Jude's Charity Auction.

Love ya,
~Deb~

Wednesday, August 20, 2014

A Blinged Out Ride

As we continue with the fantasy theme at Miriam's Crafting Blog I decided to go traditional, the real deal, original fairytale material. I made Cinderella's Coach and I had a ball doing it!

I took a foam pumpkin, painted it white, and then sprayed it with Krylon white glitter paint. A couple of coats gave it a really nice sparkle! Then I began to build; metal tags painted shiny silver for the wheels, mounted on wood skewers painted sliver for the axles, a broken metal stand taken apart became the breeching dee, rigger, and hitch, and a miniature mirror became the door. I used strip of a pop can covered in material to make the seat and coachman's foot step.

After that is was a matter of embellishing. I used Bronze Tone Flower Embellishments for hubcaps and placed gold Candy brand dots for centers; Star Flowers painted silver with Krylon Mirror Paint then cut in half became the crown dotted with rhinestones and flat back pearls. The metal flowers, rhinestones and pearls are all from Miriam's Crafting Supplies.

Final touches included tiny strings of pearls, ribbon and flowers (some of which I painted to match), adding the chain for the harness, and of course the horses. The Cinderella figurine I picked up at Target while I was looking for the horses simply because she was so perfect with it!

And here is the final result for your inspiration, hope you like it!


Don't forget to link up to this month's challenge at Miriam's Crafting Blog for your change to win a gift certificate for her store. I Adore working with her items and if you haven't tried them now's your chance to try and win some! Click on the link above to go right to the challenge page.

Love ya,
~Deb~

Tuesday, August 19, 2014

"Finishing" Series...Two new videos

If your interested, I've made two new videos in a series helping to teach how to finish projects off so they look complete. In the Group Chic Craftique I am the education coordinator and I was asked to help some new crafter's learn the ability to look at something and tell if it looks finished. Well that isn't an easy task because every one has their own eye for art, so with that in mind, these are my idea of  "finished". Hope you enjoy them.


Love ya,
~Deb~

Friday, August 1, 2014

Woodland Fairy Dress Form and a New Blog

Hello Everyone! I'm finally settled in my new house and have begun crafting again! Today I have two things to share with you.

First, the new blog for the store has launched with my design team for inspiration! I can not wait for you all to see the lovely things they come up with. Please go check it out when you are done here. We will post twice weekly there and I really hope you'll follow that blog too! Click this link to open it in a new window :

Gone Artsy Blog

Next is my Friday Try This At Home Tutorial for Miriam's Crafting Supplies. I've done my first video in a long time and I hope you really enjoy it!


Thanks for stopping by today!

Love ya,
~Deb~


Wednesday, July 16, 2014

Feathers in a Box

I needed a box to hold my feathers. I'm obsessed with feathers. I love them. They remind me of all the good things in life, beautiful birds and angels come to mind. Plus they are soft and fluffy! With limited space in the new house here in Florida, I don't have the space to hang them like I did it at the old house. I don't want them getting ruined and flattened by being in a drawer. They need their own place. Did I mention I was obsessed?


Before I moved to Florida, my mother gave me some silver items that would go to me in their will. She wanted us kids to have a few of these things now to start enjoying. That part bothers me, no one likes to think about their parents getting older, but it is a fact so I took them. One of the items came in an old box. I'm not sure how old the box is but it's been around my whole life and I'm 50. It's old.


I took the box and gessoed it up. Then I used some gel medium, lavender acrylic paint, and pearlized medium to give it color. I wanted the fact that it was old to show through some so I then sanded some of the edges and distress inked them with Dusty Concord. In the picture you can see the bottom of the box sanded but not inked and the top of the box is after inking.


I have some absolutely stunning 7.8" wide lace in my Gone Artsy Zibbet store in a lavender and mint pattern. I adore this lace. So I pulled some out to use on my box. Some times worrying about profits just isn't worth it LOL. So I glued the lace to the top of the box and wrapped more around the outside of the box, tucking it inside as well. I wasn't going to waste this stuff! This picture is actually after completion but it shows the inside.


So let the fun begin! Time to decorate! I took 4 bronze toned box feet from Miriam's Crafting Supplies, and "patinaed" them with mint acrylic paint just rubbed on with my fingers. I did the same to some purple beads I had on hand, 2 bronze toned star flowers and 3 metal leaves (a slightly darker green paint) also from Miriam's. Then I did it again to 2 silver toned star flowers but using a concord grape acrylic paint.

I decided to use the flowers upside down so I could give them a different look then you normally see when I use her flowers. I wanted more of a cup shape with bent and molded petals. After they were shaped I glued the purple tinted one inside the mint tinted one.

I have to tell you, the group I belong to on FB, Chic Craftique, is full of fun, talented and generous individuals. We are currently doing a Christmas in July theme and everyone was invited to list a few small items from their personal wish list. One of mine was mint embossing powder. I have looked all over the place for some and haven't been able to find any. I really didn't think it was one that could be fulfilled but it is small and on my wish list so I put it in the mix. Well yesterday I got a huge surprise from Michael Farrell. He's a wonderful crafter that has been great at participating in the group. Talk about jaw dropping stunned! I couldn't believe it when I saw the jar in the package. It was pearl mint and gorgeous! So of course I had to add some to my mint and purple project! So I pulled out my feather stamp, a tag, the concord grape ink, and the embossing items and went to town. I colored, I sprayed water, I ripped and then the glorious moment when the embossing was done and it was MINT!!!!! YAY! Oh I had to experiment more! MORE, MORE, MORE! I LOVE this stuff! So I took 2 small white roses and patted them into the embossing medium and dipped them in the powder. I heated them up and looked. Huh, not quite as stunning as I was hoping but still pretty! OK, I was maybe a little over enthusiastic but seriously, when you look for something for like 9 months and can't find it and then someone gifts it to you it's like dancing on a cloud.

Ahem, back to business. I glued the embossed tag on the top of the box and then I pulled out my next treasure which was my original grand item for the box top { now I have 2 :o) }. The very first pin I ever made for a swap. You've seen the picture. It's the purple heart and wings with the feather on the top right of my page. I made myself an extra to keep as a memory of my first swap and had it tucked carefully in a padded box. I added that to the top then started layering the flowers, leaves, jewels,beads and the feet. Done and I love the result. My feathers are going to have a happy home!


Thanks for stopping by today!

Love ya,
~Deb~

Wednesday, July 2, 2014

It's All About Containment...or Containers in Other Words!

Another new challenge has started at Miriam's Crafting Blog and this time we were tasked with containers. Well sure...I could have done a simple paper covered box with some pearls and ribbon but THAT IS SO NOT ME!!! Plus I Officially opened my store on the 1st so I had to do something to work them both in right?

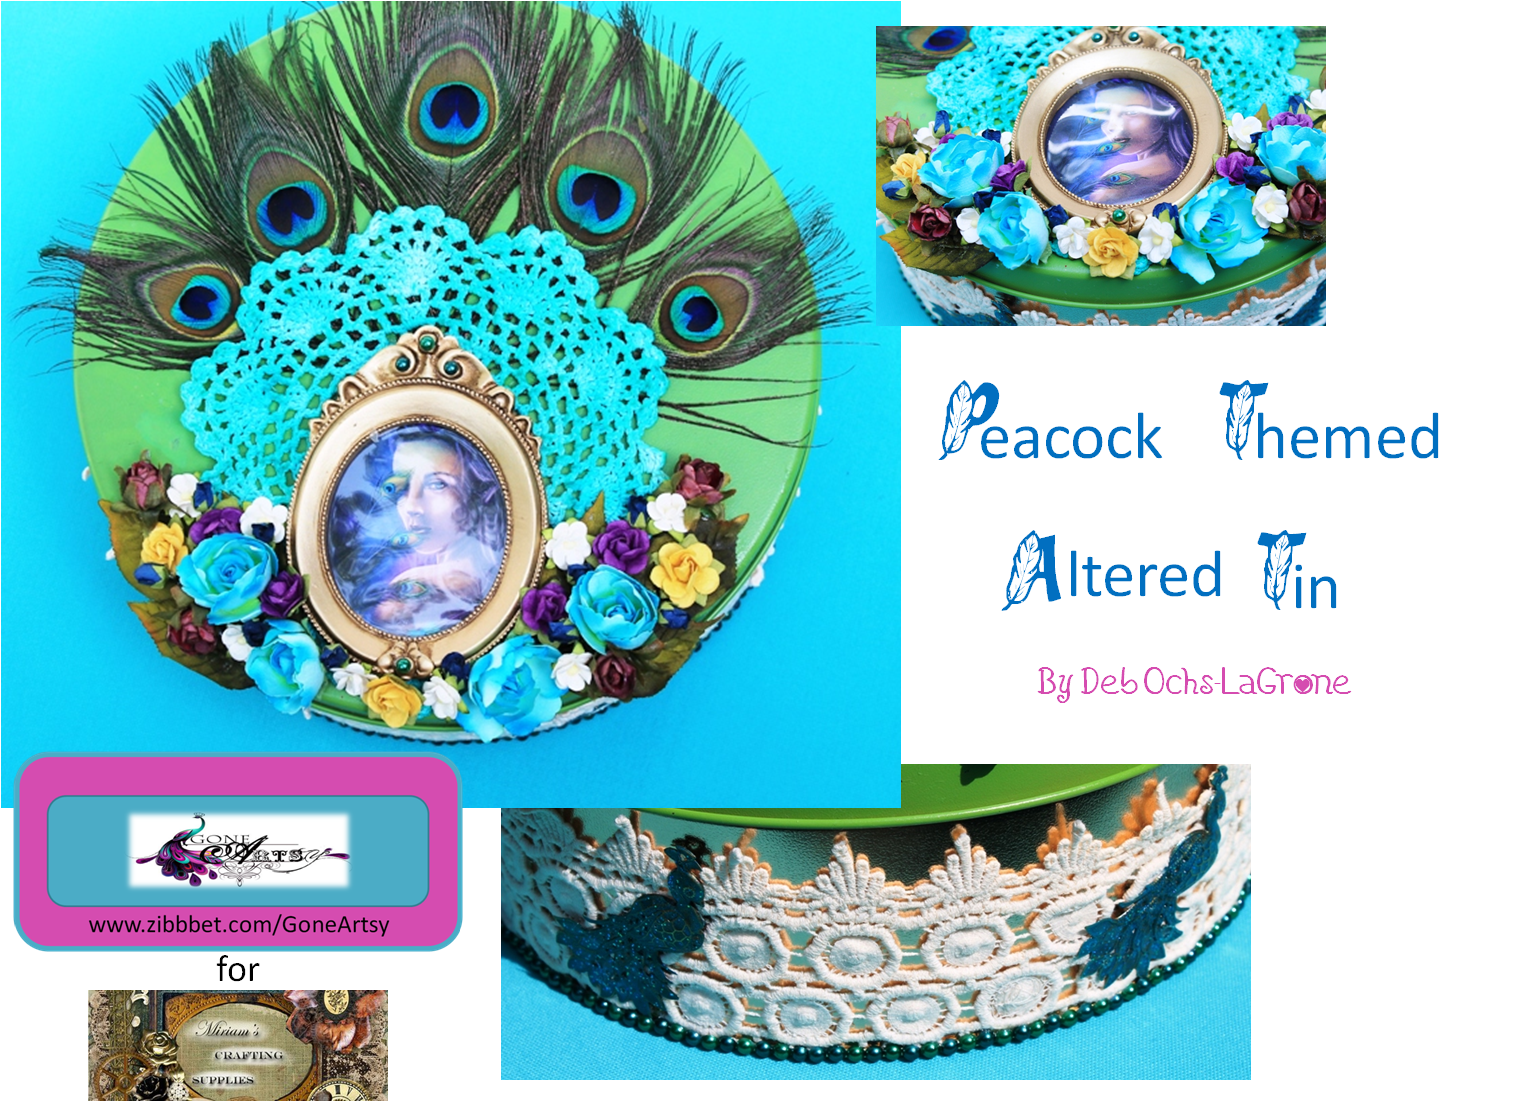
With that in mind, I altered a big round tin, with peacocks, and lace, and doilies, and feathers, and pearls and so many fun and pretty products!

So from Miriam's store, I used these beautiful peacock embellishments and then painted them with Adirondack Acrylic color stream and then topped that with Tattered Angels Pixie Dust glitter paint.


And also these two colors of 5mm flat back pearls, teal and hunter respectively.


From my store, I used a doily, crocheted lace, and some peacock feathers. Everything else was from my stash (flowers, frame, and tin).

The doily I stained with Tim Holtz Peacock Feathers Distress stain and then got it wet and scrunched it till I got the mottled look I was going for.


And here is the result!


So come on over and join the fun at Miriam's challenge and try to win a gift certificate! She has so much awesome stuff and the BEST prices!!!

Love ya,
~Deb~

Wednesday, June 25, 2014

Auction Pieces

My friend L Miriam Meserve of Miriam's Crafting Supplies is opening a brick and mortar store. The DT for Miriam's Crafting Supplies along with a few friends are helping her host an auction of handmade items to raise money to help with her endeavor. Where she lives there is no craft stores within a reasonable distance so we hope that her store is a rousing success and we want to do everything we can to help our fellow crafters and entrepreneurs. So I have made a set of wine glass charms. I am also doing a tutorial with it in case you don't win the item or can't afford to bid on them. Please though, someone bid! She needs our help!

So here we go...

Wine Glass Charm Tutorial

Supply Item list -

1. Wine glass rings (available now in my store which I haven't announced anywhere yet so your the first to know! Details at the bottom of the page)
2. Your choice of beads
3. A hanging charm for each ring. Mine are from Miriam's Crafting Supplies and are all based around this months WINGS theme
4. Jewelry pliers


Assembly -

1. Take a ring and your pliers.
2. Open the ring and then gently bend back the notch.


3. Start stringing your beads in the order you desire. I used some rhinestone dangle charms along with metal beads. To get the rhinestone to show I just gave them a gentle twist bending the top enough for it to lay flatter. These dangle stones are also available in my store!


4. When all your beads and your charm are on the ring, gently bend your notch back in place.


And there you have the finished product! Here's a few pictures of the set I made.


Miriam's Auction will be held July 27th - July 30th. Go bid on some of the magnificent projects there! It isn't a big auction, but every little bit helps when your raising money :) I will put the link up the day of the auction so look for it Friday morning!

Now for the details that only YOU will know at the moment about my store. I currently have about 75 items listed and have more coming in daily, which is why I haven't announced it yet. Before I make the BIG announcement, I want to be fully stocked. The theme tends towards wedding and shabby chic. It's mostly lace, doilies and a few other embellishments and glass crystals.  I do have one EXCITING new tool that I'll be bringing to all of you but I am saving that for the day I make the announcement so it isn't up yet. I'll be giving some of them away so stay tuned! In the mean time I'd love for you to check it out.

One of the very unique things about my store is that you can ORDER IN 1/2 YARD INCREMENTS. I know how many times you don't need a full yard and now, you don't have to worry about all those left overs...unless you want to that is! You can order as many 1/2 yards as you think you want and you will get it in a continuous piece. I hope you like this new idea!


Here's the link:      Gone Artsy  Hope you stop by and take a look and let me know what you think!


So that's it for me today!

Love ya!
~Deb~